This page is for the general public to learn how the Estate Plugin works without accessing the Admin section of this website. The Tab sections below detail the various features of this plugin and are included in the Admin Area.
This plugin is in development and this section is incomplete. Many more features are in development that are not documented here yet. Please check back often to see what has changed.
Good News! This plugin for the e107 Content Management System is now available! Click Here to Download Release v1.0.1.
The Estate Plugin for the e107 Content Management System started as a way for an individual Agent to easily create a personal website for their property listings and has evolved to handle an entire company with multiple agents and agency locations. It was not intended for use by the general public to sell thier own property but now includes a setting in the plugin's Preferences that you can turn on to allow Members to list their own property.
There is also an Agent Contact Form that can be used to request a quote or arrange a viewing. The contact form is available to everyone by default, and can be set to Members Only in the plugin's Preferences. Each Agent can change this setting for themselves in their own Agent Profile.
This plugin uses three special User Classes (Permission Levels) that control what a user can do within this plugin's Admin Area. Any user set as a Main Site Admin can always access everything. Users with access to this plugin as an ESTATE AGENT, ESTATE MANAGER, or ESTATE ADMIN can create, edit, and delete listings via the back end forms ONLY IF they are an Admin and assigned one of those specific User Classes. You can also grant your Website Members the ability to post their own Private Listings, but more on that later.
The plugin's Admin Area Menu for the three access levels::
| Estate Admins | Estate Managers | Estate Agents | |
 Estate Admins have full access to Agency Locations, Agents, Listings, and all other data. |
 Estate Managers can access the Agency Profile to which they are assigned and any Agent Profiles and Listings assigned to the same Agency Location. |
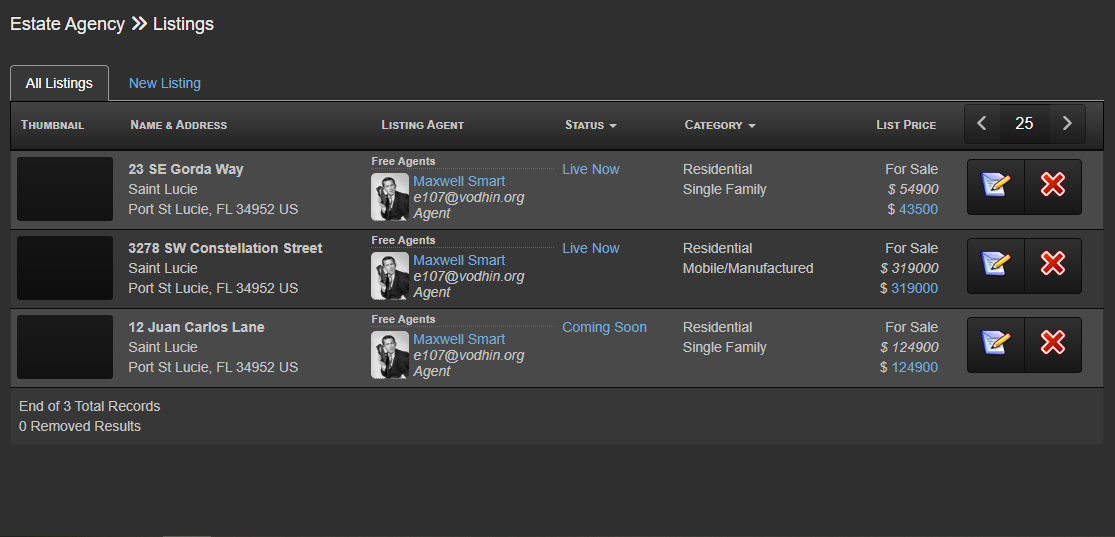
 Estate Agents can only access their own Agent Profile and Property Listings. |
This hierarchy is established through the e107 Website System's User Class settings. While you can make your user assignments through the e107 User Class interface, it is recommended that you manage your users through this plugin: When remove a user's access to this plugin it can determine if a user has Admin rights to other sections of your e107 website and keep or remove their Admin status based on that information. You can find a complete list of your users on the User List tab on the Agents & Agencies Form, provided that you yourself have the correct permissions to do so (You do NOT have permission).
Agents can always create, edit, or delete their own listings, as can Managers and Admins. Some data used in each listing, such as Zoning Category, Property Type, Countries, Counties, Cities, and States (and many other things) are saved separately from Property Listings, thus becoming options for other Agents to select from (Shared Data).
[Currently Enabled] You can allow Members who have joined your website to post their own listings by enabling this feature in the Estate Preferences. This option is disabled by default. If you enable this feature, Non-Agent users can create, edit, and delete their own listings using a basic form accessable via the Front end. They do not need Admin rights and will not be able to access any part of the Admin area of your e107 website, including the Estate plugin Admin area. Non-Agent users are able to add (but not Edit) some shared-data, such as State, City, and Postal Code, but cannot add Preset Data such as Listing Type, Zoning Category, Property Type: they are forced to select from options already in the system.
Listings posted by Non-Agents can be moderated by Estate Managers or Estate Admins, but not by Agents, and by default require an Admin or Manager to approve the listing before it is visible to the public. These listings are saved to the same Database tables as your Agent listings, but do not have an Agent ID assigned to the Property Listing and will appear in a separate list.
Only Estate Admins and Estate Managers can set your e107 website Users as Agents. When you grant acces to the Estate plugin to a Non-Admin user of your e107 website they will be automatically granted Admin Rights and ONLY for accessing this plugin.
Estate Admins have Menu button labeled Agents & Agencies which will list all Agencies and all Users. The Agencies Tab has a list of Agencies. Click the Edit button to make changes to that Agency and also see a list of Agents assigned to that Agency (See the Estate Managers section below). To add a new Agency, Click the + button at the top of the list.
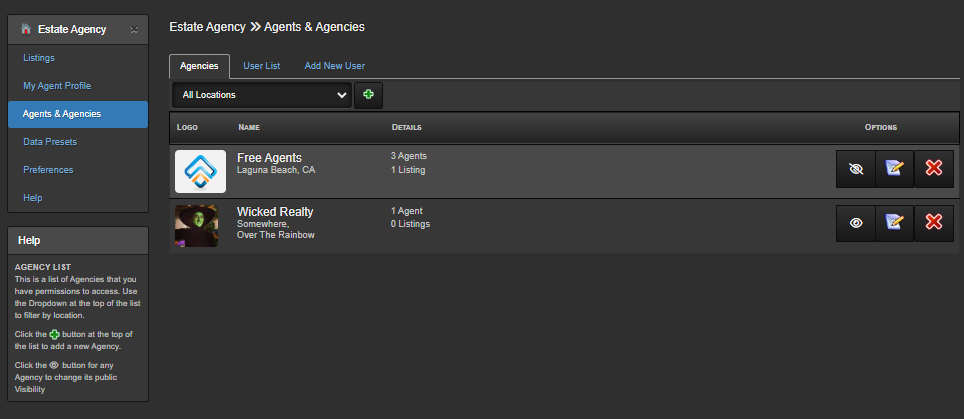
This is your list of Agencies/Locations. The Locations Filter Dropdown at the top lets you show only Agency Locations in a select area. Add a New Agency by clicking the + button at the top of the list.
Each row includes a button to Show/Hide that Agency from the public (Include or Not Include with an Agent's Information Card), an Edit Button, and a Delete Button. Deleting an Agency Location will affect your Property Listings and Agents assigned to that Agency, and you should be asked to re-assign those Agents and listings before Deletion will happen.
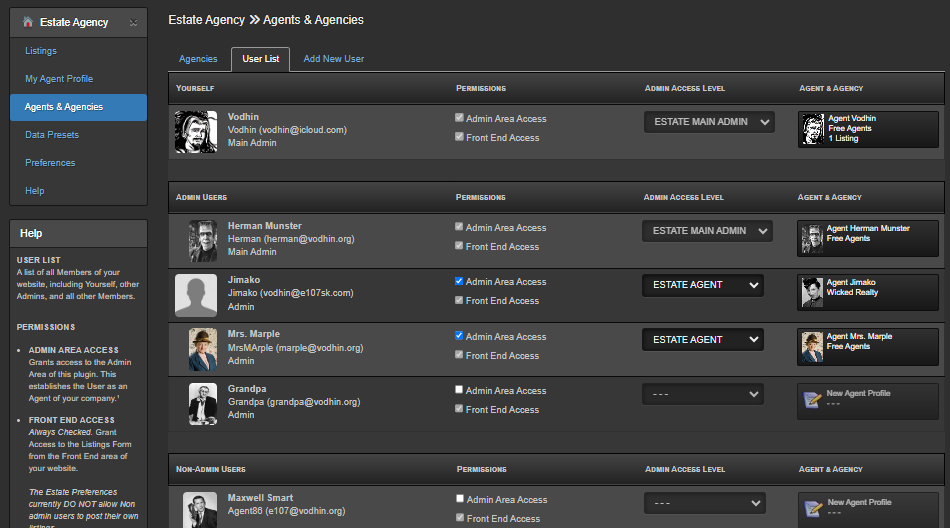
The User List Tab lists all users of your e107 Website regardless of Admin status or Agency affiliation. This list is devided into 3 sections: Yourself, Admins, and Non-Admin users. Note: Users who are an e107 Main Admin cannot have their settings changed via this form since they are automatically an Estate Admin.
This list shows Users that you have permission to assign as Agents, Listed by their e107 Login Name. The options for each user will auto-save when any changes are made. Here you can set a User's Permissions and their Admin Access Level. Unchecking an Agent's Admin Permission will remove their Access Level and you will be asked if you want to delete their Agent Profile (you do not have to, in case you intend to bring them back later). Clicking the Agent Profile button will take you to the form to edit tht User's Agent profile.
You can also quickly add a New User with a New Agent Profile to your e107 website from this plugin. New Users added via this form will be automatically given Admin Status with access only to this plugin. Information about this New User will be used to create a New Agent Profile that can be edited later. This form mimics the e107 Quick Add User form (v2.3.3) but also allows you to upload their User Profile Image if you have one.
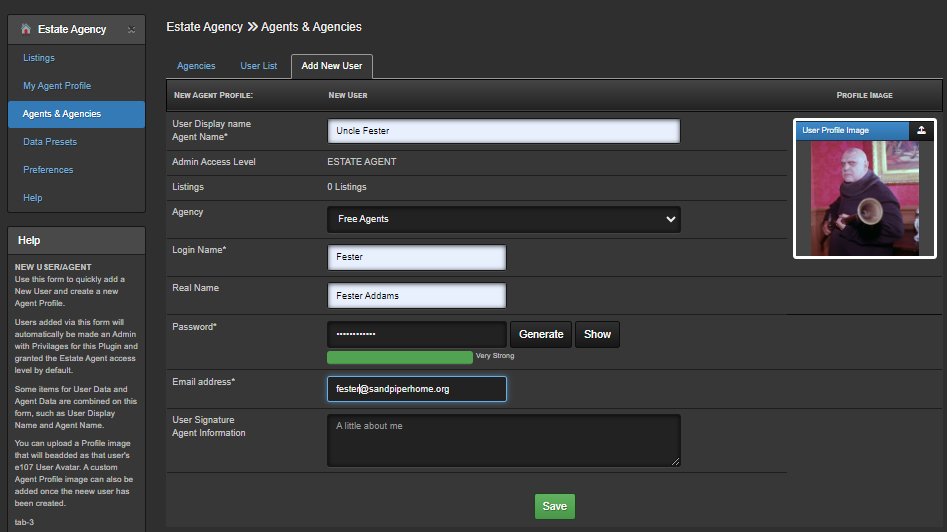
NOTE: A Main Admin can control who can access the Add New User form from the Estate Plugin's Preferences Page. The default setting allows only Estate Main Admins and Estate Admins to access this form. You can allow your Estate Managers to also access this form, though any New User added will be assigned to the same Agency as the Manager.
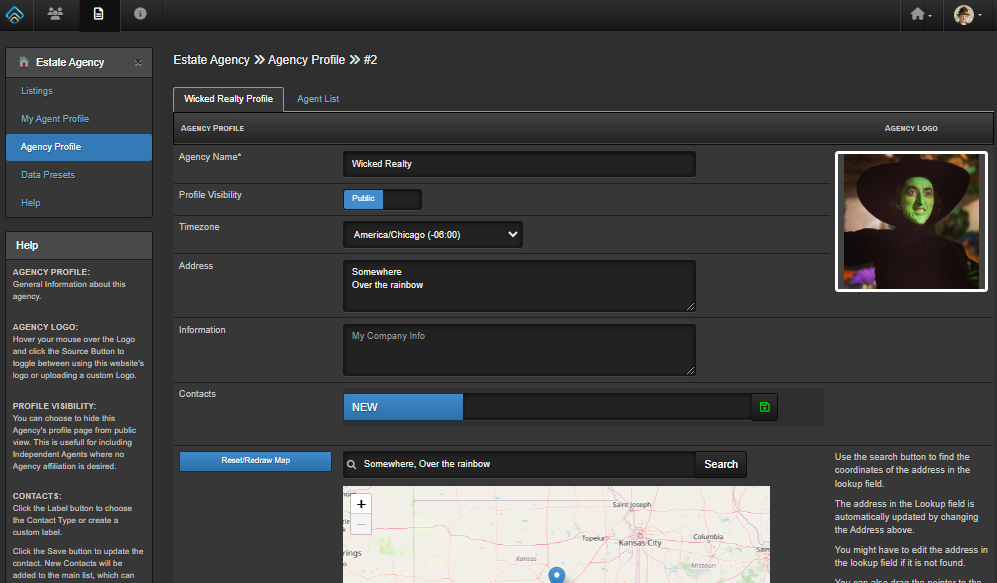
Estate Managers have a Menu button labeled Agency Profile, which allows them to modify the Agency to whch they are assigned, including adding and removing Agents for that Agency. Additionally, the Agent List Tab allows Estate Managers to Select from and Add Users to your e107 website to be assigned as Agents.
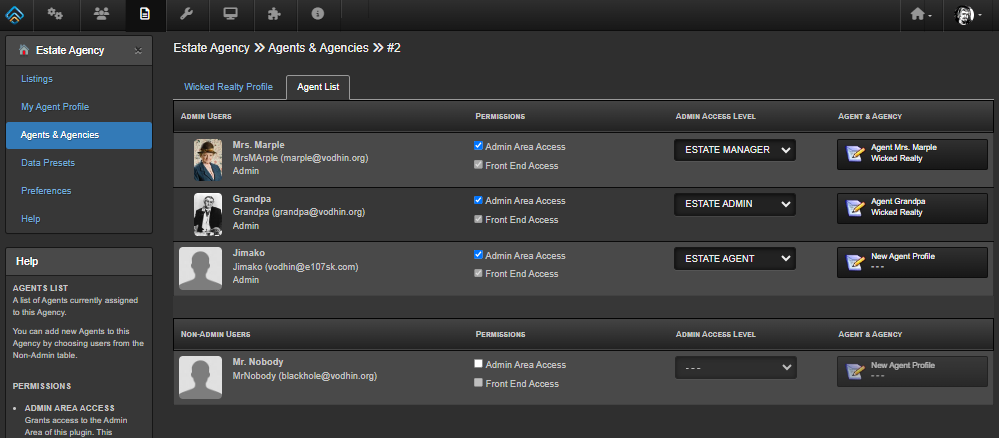
The Agent List Tab lists Agents currently assigned to that Agency as well as e107 website Users not assigned to another Agency. This is very similar to the main User List available to Admins, but is limited to that specific Agency: Managers can only assign Agents, and those Agents will be assigned to the current Angecy loaded into this form.
This is the main list of the properties. From here you can review your listings, quickly change their status and update their current Price. They can also be Editied or Deleted from this list. Clicking on the top Header Bar Labels will open a Filter Function to further refine the list based on critera related to that column. You can also control how many results are returned.
Below are some examples of what each list would look like based on that user's Access Level.
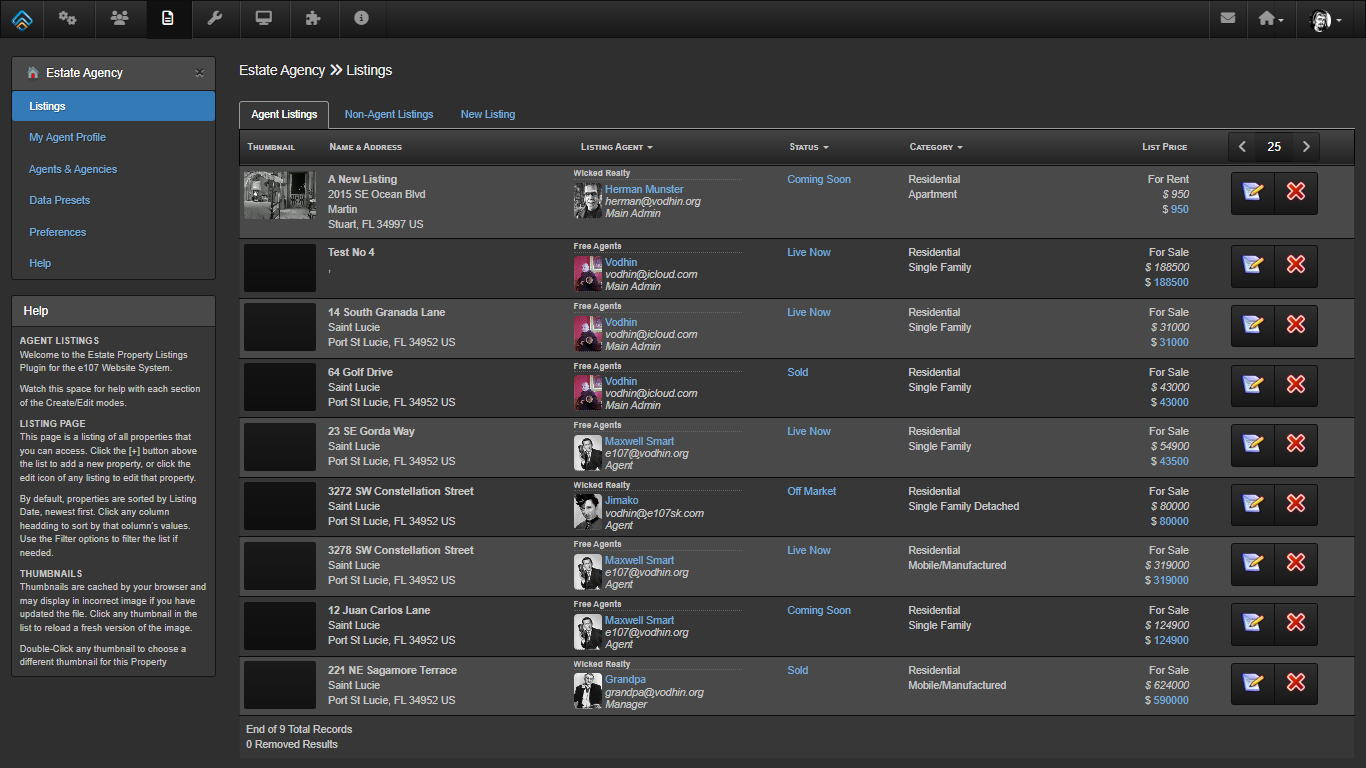
An Estate Main Admin or Estate Admin would see everything, including any Non-Agent/Private Listings in their own tab (see below).
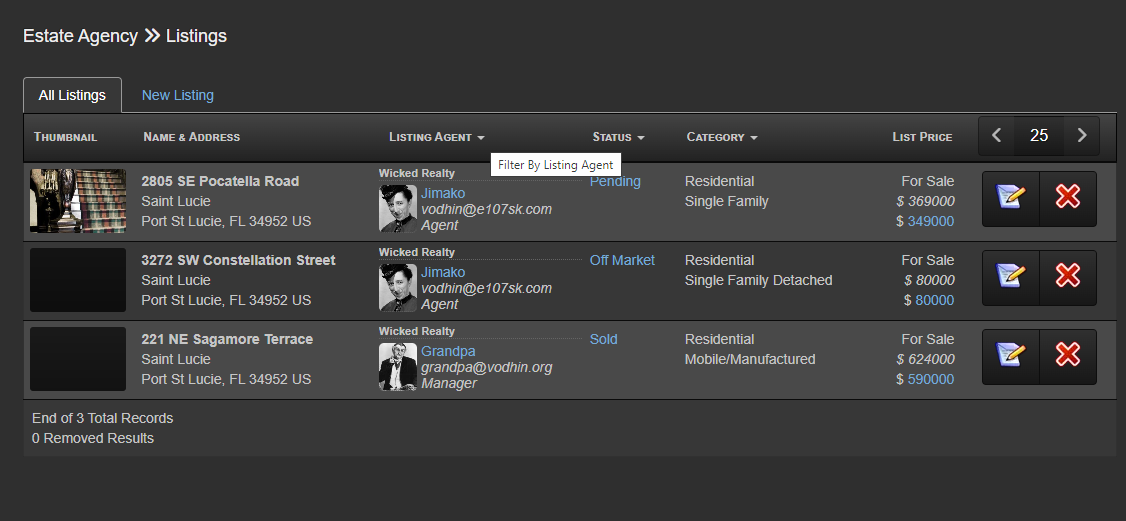
Estate Managers would only see listings made by themselves and Estate Agents assigned to the same Agency that they manage (but not listings made by other Estate Managers, even if they are in the same Agency). If Non-Agent Listings have been enabled and Estate Managers are allowed to Moderate them, then an addition "Non-Agent Listings" Tab will be accessable.
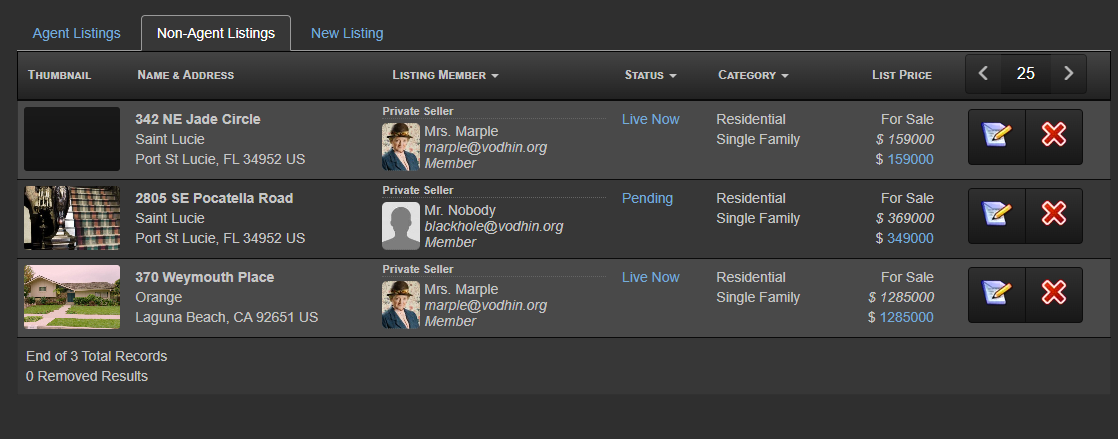
If Non-Agent Listings have been enabled in Estate Preferences and you have premissions to moderate those listings, you will see a Non-Agent Listings tab, which will display those listings is a separate table.
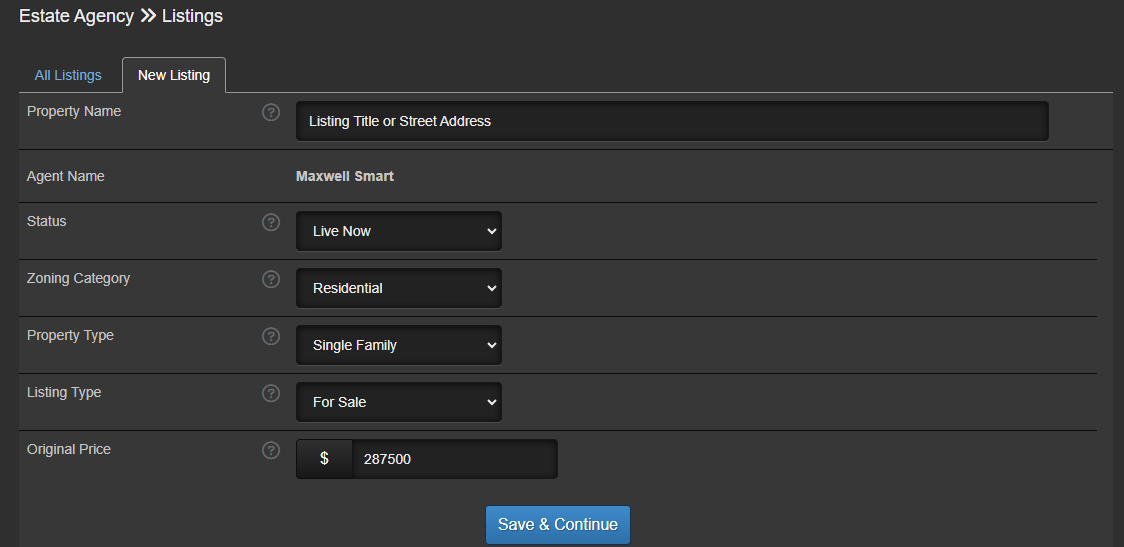
Every Admin, Manager, and Agent can Create a New Listing. This tab contains a simple form that is used to start the process. Simply fill in the Property Name and some basci information and click the Save & Continue button. This will save the new property and open the Listing Edit form where you can add more information, define special features, and upload images.
Many Dropdown lists used in this plugin can be edited in order to update the options for that dropdown without interrupting a user's workflow. Estate Managers and Estate Admins can change existing information while Estate Agents can only add new options. Any new options added by one user will become available for all other users and any changes made to existing data, such as correcting a misspelled name, will update all listings.

In this example the Edit button opens a form for City data:
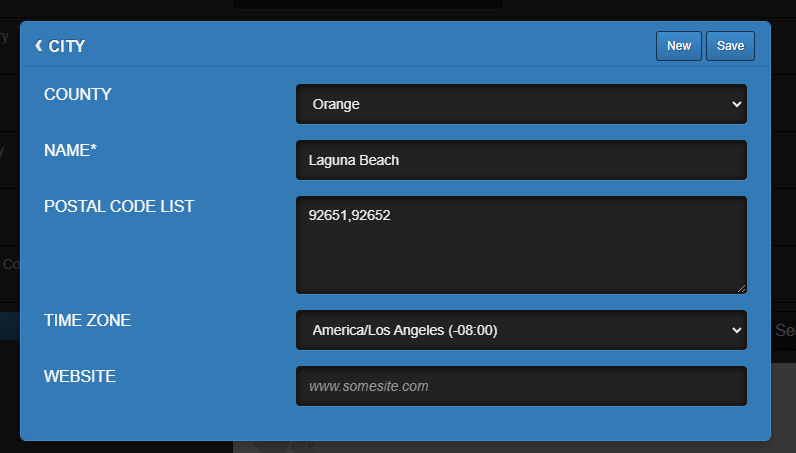
As you can see, this is more than just the City's name: the city belongs to a county (which itself belongs to a state) and also has a list of Zip Codes (used for the Zip Code Field), a Time Zone selection (for adjusting scheduled events), and a spot for entering a website address for the city. These editable dropdown lists can also act as filters for other dropdown lists, making it easier for Agents to find the data they are looking for.
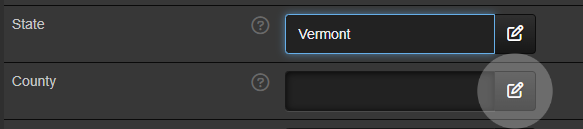
When a dropdown list option is selected, the options for other dropdown fields may also change. In this example, changing the State will change the options for County (which in turn affects the options for City, Postal Code, Subdivision, and so on). If no options are available for the filtered dropdown lists, you will see an animated "sonar" blip prompting you to add a new option to the affected field.
Spaces are rooms in the building or exterior places - anything related to a space on the property. Spaces are keyed to the listing's Zoning: changing the Zoning changes the Types of Spaces you can add. Each space has it's own set of data points such as dimensions, description, feature list, and image gallery. Spaces are grouped into separate tables on the Spaces tab. Add a new space by clicking the + button in the table headder. You can change the order of your spaces by dragging the up/down arrows in each row, and you can reorder the groups by dragging the up/down arrows in each group's table headder. You can even drag a Space between different Group Tables.
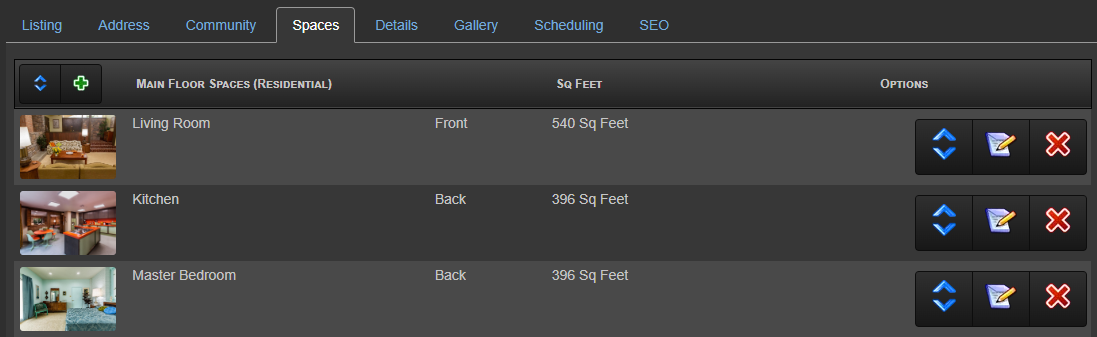
Spaces are grouped together by the Group Name selected when creating a Space, such as Main Floor, First Floor, Exterior, etc. New Groups are added when you save a space assigned to a new Group, which will add a new Group Table to the Spaces Tab on the main listing form. These group Names are shared with other property listings with the same Zoning Category. Anyone can add a New Group, but only Managers and Admins can edit existing group names.
When you create or edit a Space, you will open a sub-form for adding that data. This form is divided into tabs for different options. Any item with an * is required to have a value before you can save the space.
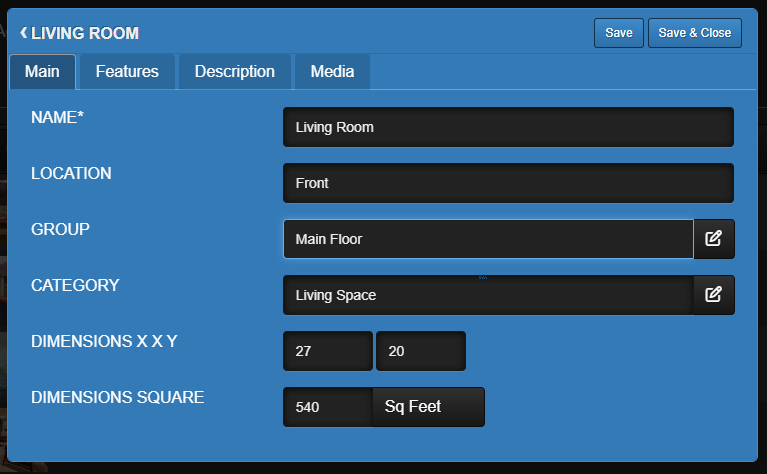
Some options on this form, such as Features and Media, are not available until the Space has been saved. The Main tab on the Spaces form includes basic information about the space, including its Location, Group, Category, and Dimensions for that Space.
The Spaces Form - Main Tab |
|
 |
Location helps identify where the Space is on the property but is not required. |
|
The Group is required to group Spaces that share an area, like Main Floor, Second Floor, or Exterior. Select a Group for this Space or add a new Group to create a new group of Spaces. The Category defines what type of Space the room is and filters the available Features on the Features tab for that Space. Select or create a Category for the Space. Categories are saved separately from the listing and they will be available for other listings of the same Zoning Category (Residential, Commercial). Demensions are helpful to a potential buyer but are not required. Enter the Length and Width of the Space and the Square Footage will be automatically calculated. You can toggle the unit of measurement between Square Foot or Square Meter for each Space. A new Space will default to the Unit of Measurement preset in Estate Preferences. |
|
The Spaces Form - Features Tab |
|
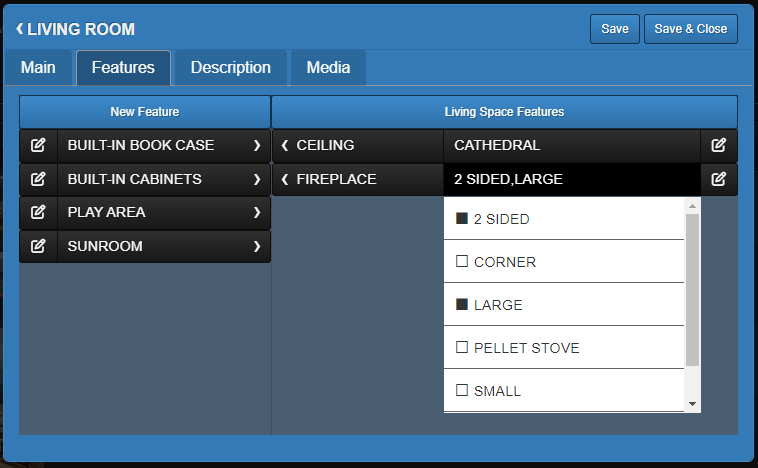 |
The Features Tab has list of available features on the left side and a list of features currently assigned to the space on the right. |
|
You can Add a new Feature by clicking the New Feature button at the top of the Left column, and Edit any Feature by clicking the edit button next to that Feature's name. Features are saved independent of the listing, making them available to use for other listings. If you change the Feature Name on one listing, it will update for all other listings. Click any Feature in the Left Column to add it to the Space: it will move to the Right Column. If the Fesature has additional predefined options, the button will include a drop-down list where you can select any that apply or none at all. |
|
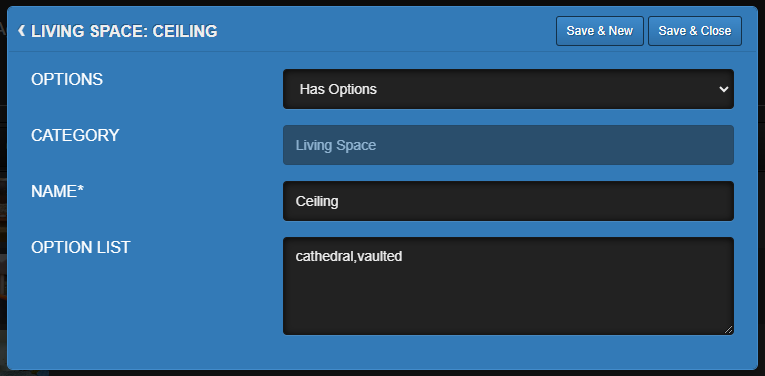 |
Clicking the Edit icon next to a feature will allow you to change that feature. This form lets you change the Name and add/remove Options* |
|
Options are saved as a Comma Separated List, and appear in the Feature Select Form as a Dropdown list with check boxes to select those options as included for that Feature in the Listing. *Changing the Name will propagate to all listings across the Estate plugin because the Features are saved in an indexed Database. The Options, however, are copied over to each listing as text. Changing or removing the Options will not affect existing listings. |
|
The Spaces Form - Description Tab |
|
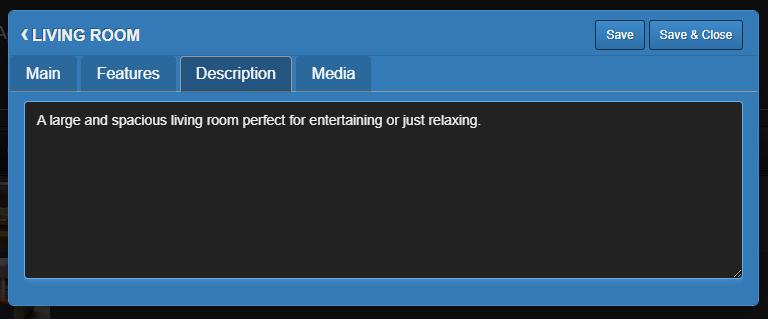 |
The Description Tab has a simple Text form where you can add some details about this Space. A couple of sentences should do. |
|
Paragraphs and Line Breaks are preserved and BB Code can be added manually eg. "[b]Bold[/b]" for bold text, "[i]Italic[/i]" for italic text, and "[b][i]Bold Italic[/i][/b]" for bold italic text |
|
The Spaces Form - Media Tab |
|
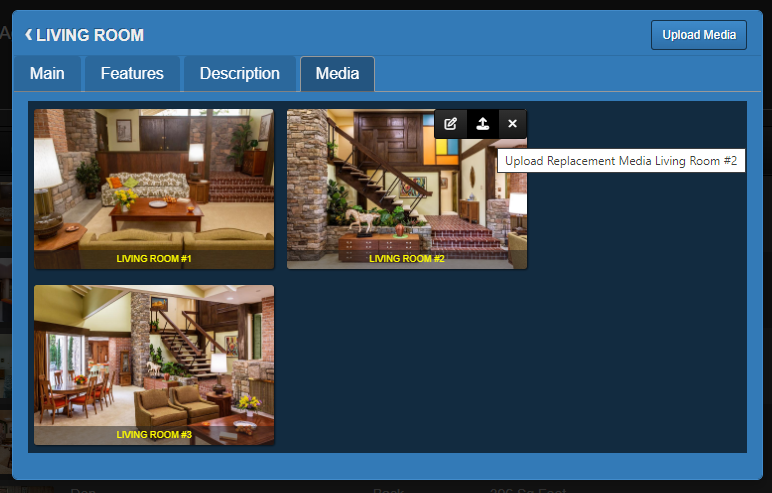 |
Here is where you can add Pictures specific to this Space. Images here are also available to add to the Main Gallery of your listing. |
|
Upload pictures by clicking the Upload Media button. You can upload multiple images in one go, and each will appear in the Thumbnail Tray as they load. Any changes to Thumbnails (Adding, Editing, Removing, or Recaptioning) are automatically saved. NOTE: Uploaded Files are scanned by e107 and can fail to upload IF:
Once loaded, you can Drag and Drop the thumbnails to change their order. Reordering does NOT affect the order of thumbnails in the Main Gallery for the Listing. Each thumbnail has a Caption bar at the bottom used to Name the image. You can change the name to anything you like. By default they will be captioned after the Name of the Space and the Order they are in. Hovering over a Thumbnail will show a Menu Bar with Icons to Crop, Replace, or Remove the image. Removing an Image from a Space will remove it from the Main Gallery, too. |
|